

How to rename an attribute label
Give an attribute a friendly label, such as Population (2024), in the alias box on the Format tab. Popups, search, and field lists show it. Exports keep the field name.
A renamed attribute uses a friendly label wherever it appears. For example, pop_2024 can display as Population (2024). Click into the alias input on the attribute’s row on the Format tab and type the label. The alias changes display only: exports keep the original field name, and popup variables use the original.
See it on an example map
Open the Attribute Formatting Lab. The Sites — Formatted Attributes layer is on when the map opens. Click a site. The popup shows friendly names such as Land value and Lot size. To compare, turn on Sites — Raw Attributes and turn off the formatted layer.
Before you start
- The layer must be a vector layer (point, line, or polygon).
- The rename affects display only. If you want to rename the column in your source data, do it before importing.
Open the Format tab
In the layer panel, select your layer. Click the Format tab.
The tab shows one row per attribute. The text input at the start of each row is the alias.
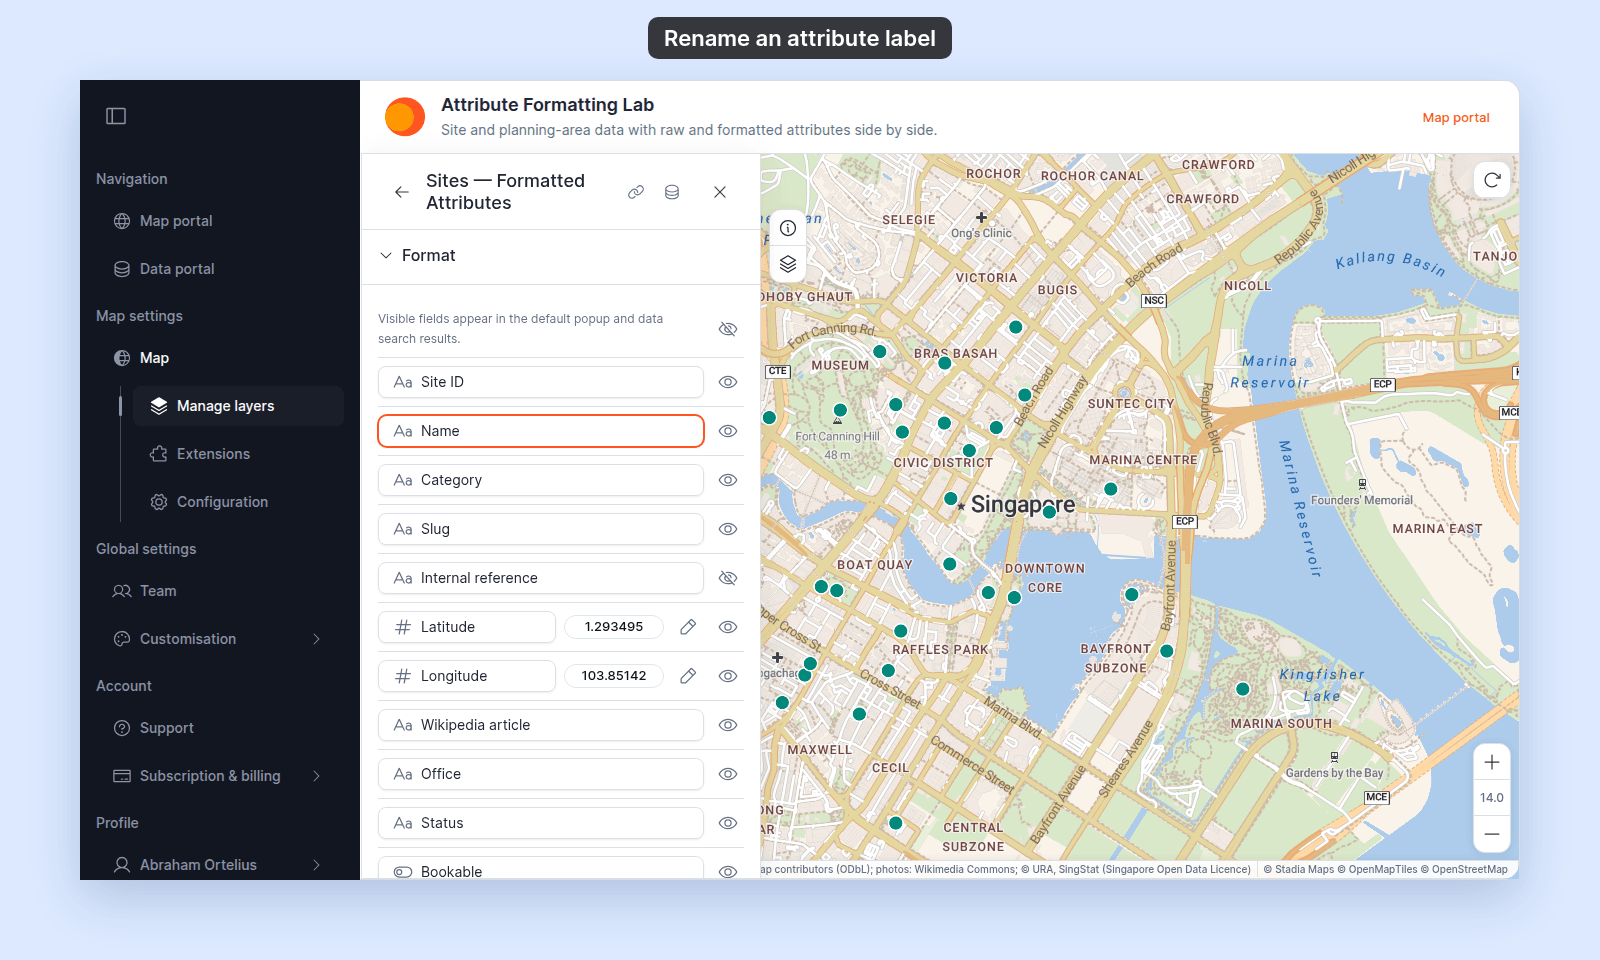
Edit the alias
Click into the alias input on the row of the attribute you want to rename. Type the new label.
As soon as you type, the alias replaces the original name in popups, search, and field lists.
The change saves automatically when you click out of the input or move to another field — there’s no separate save button.
Where the alias appears
The alias replaces the original field name in:
- The default popup label.
- Custom popup templates that reference the field by its display label (variables that reference the underlying field name use the original).
- Data search result cards.
- Print and export popups.
- The legend, wherever it names the field — for example, the caption under a size key.
- Field lists where you pick a field: the
Insert simple variablelist in the popup editor,Source attributeon theLabelstab, the field dropdowns on theStyletab, and the attribute lists in the Query, Proximity Analysis, and Advanced Search settings. Each field shows its alias, with the original field name in small grey text below it. Two fields with the same alias stay easy to tell apart. - The field lists that viewers see in the Query and Proximity Analysis panels. These show the alias only.
- The column headers of the Query and Proximity Analysis results tables. Hover over a header to see the original field name.
- The default label of a new Advanced Search attribute row. You can change the label.
The alias does not appear in:
- Category and class labels in the legend. These show the values in the field, not its name. Edit them in the style’s
Customise categoriesorCustomise Class Breakspanel. - Popup variables.
{field_name}uses the original field name, also when you pick the field by its alias. - The field lists in the conditional content builder in the popup editor. These show the original field name.
- The
Data Tabletab on the dataset page. Its column headers show the original field names. - Exports of the underlying data (CSV, GeoJSON keep the original field name).
If you want to revert to the original
If the alias has special characters
Aliases accept any text — spaces, punctuation, mixed case. Population (2024) is fine. Total CO₂ (kg) is fine. Keep aliases short so they fit in popup tables.
If you also want to hide the attribute
Renaming and hiding are independent. Set both: the rename takes effect if you turn visibility back on, and the alias persists across visibility toggles. See How to hide an attribute from popups.